Overview
For some submissions or remote working, you may be asked to submit your work/assignments using OneHub online.
Please note that where a deadline is involved, this refers to when the complete submission is available at the remote side. If any of the following apply as reasons for not completing the upload in time, then this is unlikely to be accepted as an extenuating circumstance for a late submission (please note this is not a complete list, but just examples):
- Login did not work (check ahead of time, and resolve any issues beforehand)
- Upload went slower than expected because was not tested well ahead of deadline
- Did not anticipate a slower upload speed because multiple people are all uploading at the same time near the deadline
- Did not use an upload method appropriate to what is being uploaded (see below)
Please note the maximum supported size for an individual file on the platform is 5GB. If you have any files larger than this, please confirm with your tutor first that this is actually essential for the submission. If it is, you will need to create zip archives below this limit, please see the end of this guide for instructions.
Upload Methods
Browser Based
This is the most simple method, and fine for a single file or a number of small files comprising a few hundred MB at most.
Pros:
- Simple and accessible
- Can be done without external software
Cons:
- Doesn’t cope well with complex file structures
- Not able to resume/retry uploads
Process:
- Navigate to https://onehub.com
- Log in using supplied credentials, if you were sent an “invite” email, your username is the address that was sent to. Usually that will be one that ends in @pearsoncollegelondon.ac.uk
- Upload process works similar to Google Drive or Onedrive etc, if not familiar with these, the Onehub support site has a video tutorial: https://onehub.desk.com/customer/en/portal/articles/1928785-how-to-upload-and-manage-files
FTP Upload
This method is recommended for more control and reliability in the upload, especially large ones
Pros:
- Retryable and resumable
- Problem files can be skipped without affecting the process
- Can in some cases be quicker
Cons:
- Needs access to a client like Filezilla
- Requires one-time setup (shown here)
Process:
- Launch Filezilla on an Escape machine under Linux in Applications -> Internet -> Filezilla
- Launch from an Escape Windows machine by clicking Start and typing “filezilla” until the icon appears
- On a personal machine, download and install from https://filezilla-project.org/ (available for Windows, Linux, OSX)
- Launch the program, and click the Site Manager icon in the top left, and configure as indicated in the screenshot below (substitute for your own login of course)
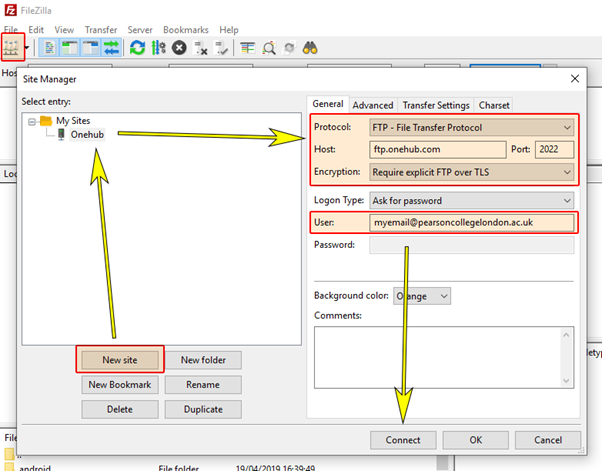
Hit connect, and you should be logged in and see any areas that you’ve been given access to.
Once connected, you should see a screen similar to the one shown below (colours have been added only for the screenshot).
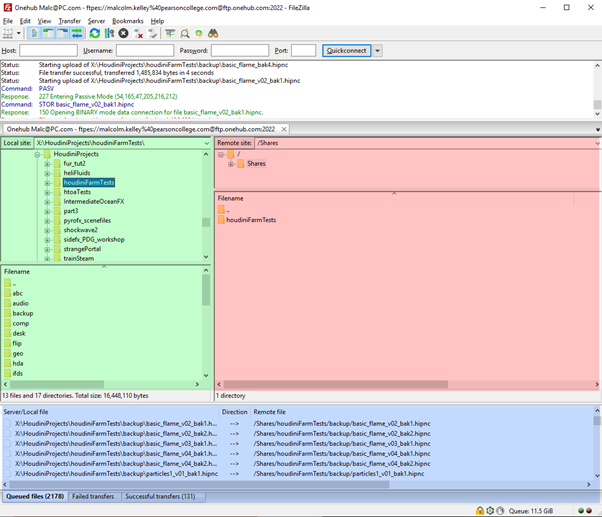
- The green portion shows the files that are accessible to your local computer
- The red portion shows the remote file system, this is where your files will end up
- The blue portion is where you will see progress of your uploads
To upload, select the directory from the top green pane, and then you can drag and drop files from the lower green pane onto the right to add them to the queue. You can keep adding more items and they will append to the queue without interrupting the uploads in progress.
Splitting uploads with large files
To overcome the 5GB individual file size limit, you can use a multi=part zip file. As mentioned above, check with your tutor first to see if the large file(s) in question are really necessary for the submission. If they are, then they will know to expect the multi-part zip archive.
To do this in windows:
- Right-click the folder that contains the files (or just the file itself if doing it separately)
- From the context menu choose 7-Zip -> Add to archive…
- In the dialog, from the “Split to volumes” drop down choose the highlighted option
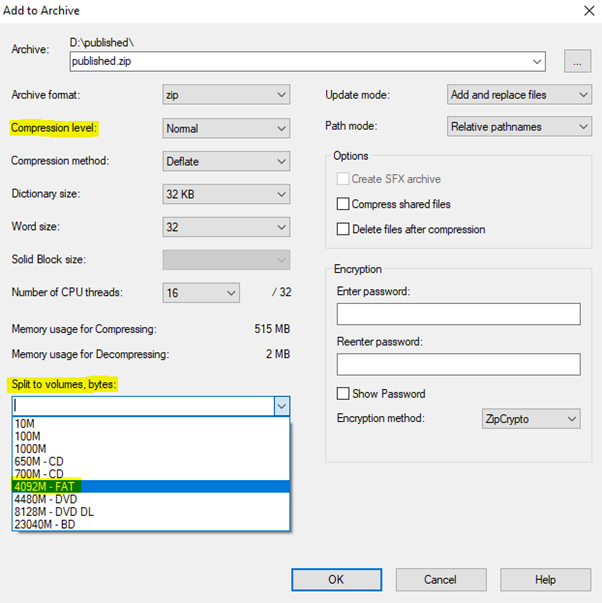
- Set any other relevant options and click OK (if you are adding video files or other files that are already compressed, choose “Store” for the Compression Level)
- Once completed, you will have several files that end in .zip.001, .zip.002 etc. These can be uploaded as described above either using the browser, or Filezilla (recommended)